-

7/21/12

Putting paintbrush to canvas...finally.

I've been suffering from painter's block.  For a VERY LONG TIME.

Not to confuse you ~ I don't have a problem slapping some paint onto an old chair, or spray painting a "roadkill rescue" endtable.  I love that stuff.  How could you go wrong?  You're taking something old and tired, or even better - free, and breathing new life into it.  That's not the type of painting that's been evading me.

Every now and then I'm able to pick up a pencil and sketch something.  Nothing extravagant...just something that has caught my eye.


But today I was determined to get out a canvas and paints and actually create some ART.  So I spent about an hour locating all of my painting supplies.  At least another hour went by with me staring at a blank canvas.  Just. Staring.  Blankly.  Finally I began sketching onto my canvas. 


AND PAINTING...

 First the backgrounds...

 Next working on some of the details...


And tomorrow maybe I can do the finishing touches.

It still needs a lot of cleaning up.  More shadows, highlights and some "sharpening" of lines and details.  There are quite a few items that need to be tweaked until they're just right.

BUT,

I painted today!!! 

Paints were squeezed into the indents of my lonely old pallet,
Colors were mixed and mingled,
Brushes caressed canvas,
Tears and laughter made an appearance,
An image took shape.

This canvas may not become a masterpiece.  It may never hang in anyone's home other than my own.  It's doubtful Museums will ever bid on it at Sothebys.


Do you see that cute little puppy in the picture?  That's our Sadie when she was just a couple of months old.  And that little boy?  That's my son, Alex, at the age of three.  He came home from a visit with his grandma to find he had a puppy waiting!  He would sit with his arm around her and tell her all kinds of things.  Things a little boy tells his best friend.  And, to top it off I was able to get past my fear of painting.   I dove in today...okay...I may have stood on the edge of the board a little too long and needed some coaxing from a friend, but I PAINTED. 

When it's done I'll post a picture of it hanging in our home...those museums will be so jealous!


Sherry


Continue Reading ...

7/20/12

Area Rugs Part 2 ~ Natural Fiber in the Family Room

New Natural Fiber Area Rug for the Family Room


Check out that amazing knappy texture.


Don't check out the clutter on my countertops, please!  Apparently I'm too busy to clean up and stage...Oops!  :( 


It definitely goes with our Cottage Vibe.  I didn't say Beach Vibe because Scott is anti-beachvibe ~ if you don't live at the beach.  I understand his perspective, BUT the beach is one of my FAVORITE places to be so I really don't see the harm in paying homage to it in small, thoughtful ways.  You won't find any buoys or anything crazy like that laying around here!  Just a color pallet reminiscent of the beach, some natural textures and maybe some small mementos here and there. 


(I don't know why the color is so washed out in these photos...except I don't know what the heck I'm doing or how to adjust the camera.  I'll figure that out eventually.  Maybe someone who knows what they are doing will give me some tips soon. ;))

The walls in this room will be the same pale grey-blue as the kitchen and dining room eventually ~ once I've worked my way around the downstairs with my brush and roller.   ;)

Just a quick reminder of what it looked like before the new rug...


And after!   Before I forget...Sadie says HI!


Continue Reading ...

7/19/12

New Area Rugs Part 1 ~ Chevron pattern in the living room


Normally I don't even dream of buying area rugs.  I love what an area rug can do for a room but they just aren't easy on the budget.  I may have champagne taste on a beer budget when it concerns area rugs!  So I've made do with what I have. 

Recently I noticed that Rugs USA was having a SUMMER 75% off sale.  Hmmm.  That brought a couple of the "champagne budget" rugs down to the "beer budget" level.  Mighty nice discount, huh!?

I quickly ordered two area rugs that I loved with our Etsy "spending money".  (That's money we made selling our projects on Etsy and saved just for something that would otherwise be out of the question.)

Here's the chevron rug in the living room:


 *You may notice that there is NOTHING on the walls in this room. 

I'm working my way around the downstairs with this new cool-toned paint color...taking my own sweet time.  It was time for something other than beige.  I thought going with something cool would be new and BOLD for us, for a change.  I love these blue grey colors.  And with the new carpet in here...WOW.


Eventually (when I get around to it) I'll have the paint and trim finished and some artwork and accessories in this room.  :)   Hopefully in the next couple of weeks.

 
 Scott's orange leather recliner plays off the blue in the carpet and walls nicely.


View into the dining area.  Oh, now I want to hurry up and finish painting down here and get some STUFF up on the walls!!!

Check back tomorrow to see the other new area rug.


Continue Reading ...

7/16/12

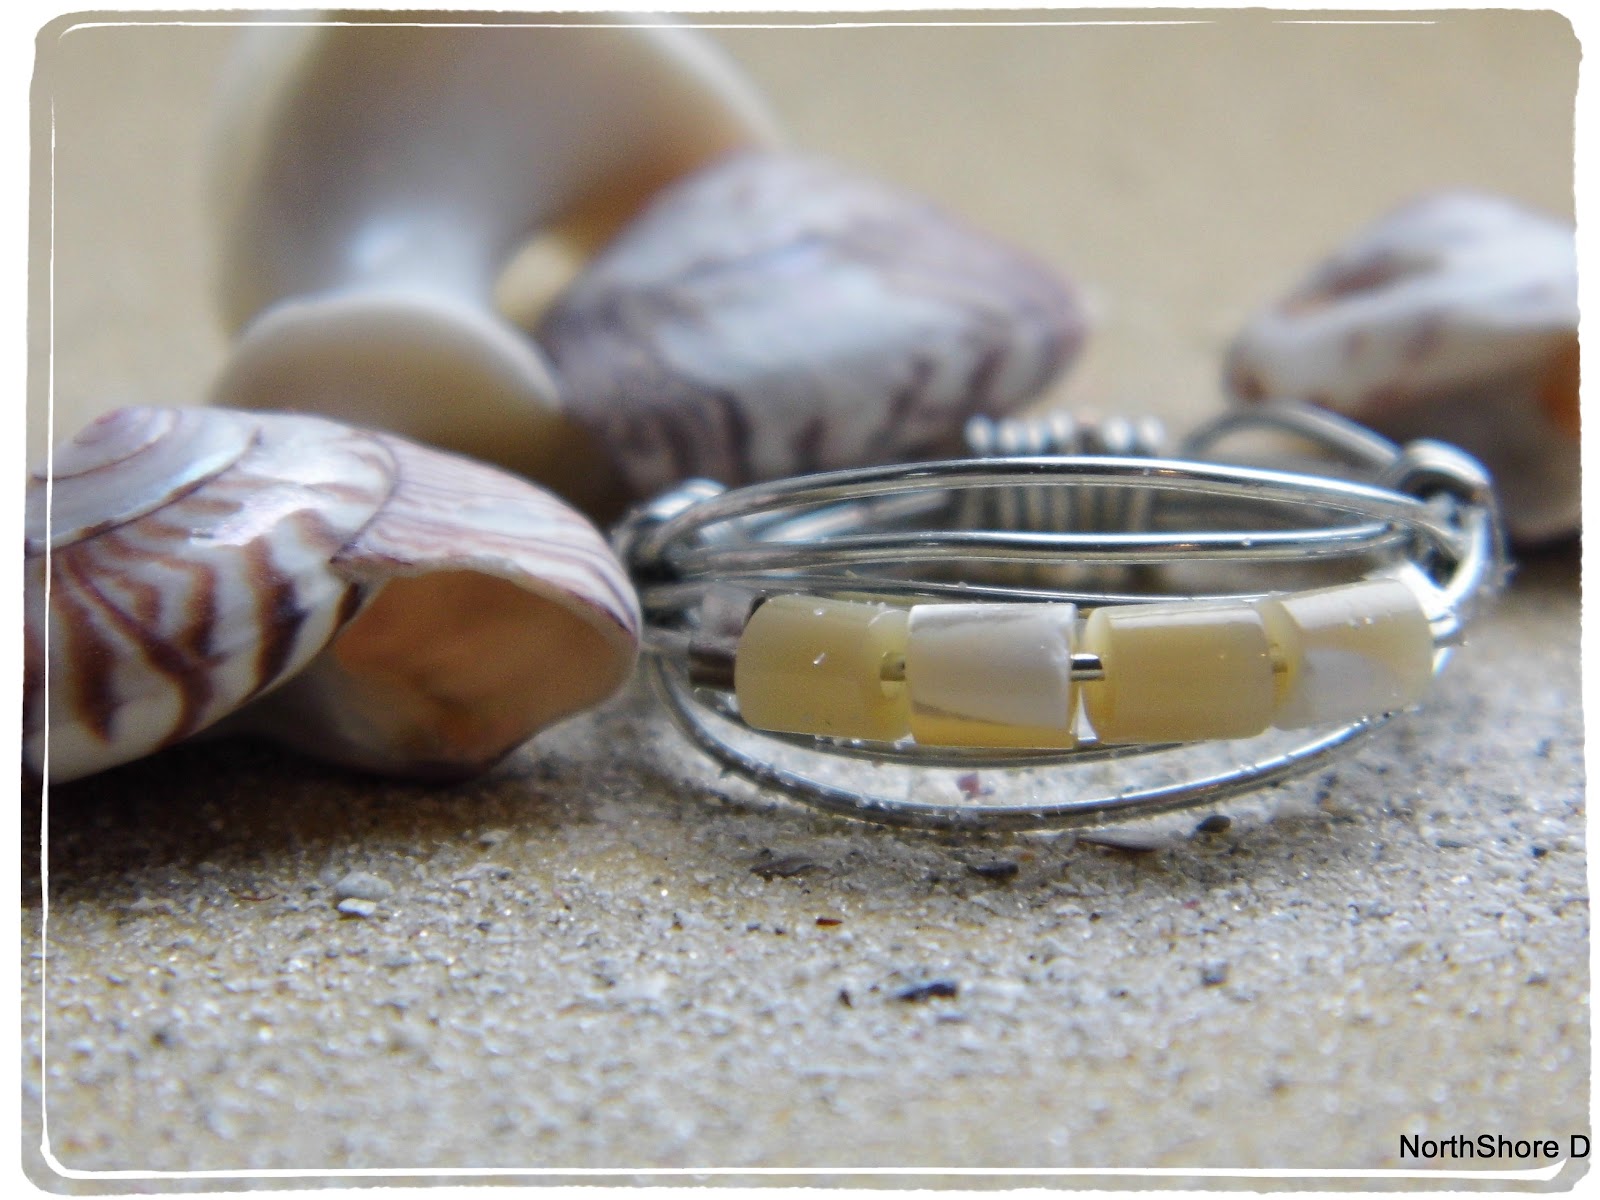
Ocean Shell Ring by Northshore Days ~ Inspiration Cafe #7

Welcome back to Inspiration Cafe! 
It's time to learn some more jewelry making skills with Natalie:


Hello Everyone and welcome to round 2 of Inspiration Cafe, we hope you have been enjoying the series as much as we have.


So...grab your cup and settle in for an easy ring tutorial..

It is super easy to make, really! Don't let all the photo's daunt you. 

You will need: a few beads of your choice , 18-20 gauge jewelry wire, 2 crimps, long nose pliers, and something to use as a measure for your finger size (ideally you would use a ring mandrel, but the lid of my nail polish bottle worked perfectly)

I have taken a picture of every step so if you follow those without evenreading my instructions - you will be fine... Lets start..

Using the wire, measure your finger, gently place around the mandrel/bottle lid and wind around a few times. Remember to keep the wire tightly packed together and it should stay in shape while you are handling it


Cut the wire from the roll and work with the coils you have made. Thread a crimp on first then your beads, then another crimp.


I found it easier to keep placing my ring onto the lid to keep the coils together and to keep reshaping as I worked. When you are happy with the location of the beads, then its time to neaten the ends by folding them at the bottom, as pictured. Use the pliers to keep the wire neat and tight. Make sure you have no sharp ends sticking out.


Once the ends have been neatened off, then tighten the crimps on either side of the beads.
To add strength to the ring and to help keep its shape - I added extra wire to the sides (optional) just by winding a piece around andending off as I did before. Give the outer coils a little pull so they frame the beads and voila!!


Now its time to show off your new ring, wear it and take photo's of it...


Easy right? Sooooo easy!!!


We thought it would be fun to match the ring with the Beach Inspired Bracelet from round one. Worked perfectly don't you think?

I hope you enjoyed the tutorial. Remember to let us know if you make any of our creations, we would love to see them.

Don't forget to like us on Facebook so you can get more updates as we create, and visit again next week to see what Mary from Sweet Little Bluebird has in store for us.

Have a great Monday and take care

xxx


Photobucket
Continue Reading ...

7/13/12

I know it's Friday and we post the Inspiration Cafe on Mondays, but we've each posted for round one and before we begin round two, we wanted to thank you for coming and make sure you didn't miss any of the fun!  We hope you're enjoying the Cafe and we certainly hope you are inspired by something you find here.  

We're also interested in a little feedback, so if there is anything that particularly inspired you, or if there is something you'd like to see more of (or less of) or maybe even added to the Cafe, please let us know by leaving a comment. We're tough, we can take it....good or bad!  We really do want this to be something you can benefit from!

Here's a wrap up just in case you missed anything:

Beach Inspired Bracelet 
from Natalie at Northshore Days

from Mary at Sweet Little Bluebird

from Heather at The Beating Hearth

from Danni at Silo Hill Farm


Round Two of the Cafe begins next Monday and we're excited, so come back then, order something tall and cool.....relax and stay awhile!  Remember, we're open late!

Continue Reading ...

7/12/12

Wanda Wonders


Isn't this painting beautiful?  It takes me away to someplace with salty sea air and warm sand between my toes.  I love it! This gorgeous ocean scene is called 'Waves Gone Wild', and it is comprised of 2 24x36 paintings on gallery wrap canvas done by
the artist Wanda Pépin.

I thought it would be fun to introduce her to you.  

Meet Wanda. 
She's my cousin, but more importantly she is a wife, mother, and professional artist.  Wanda has a quick, genuine smile and a very warm heart to go along with all of her amazing talent and creativity.  I wish we lived a bit closer so I could soak up some of that creativity.  :)

A little bio about Wanda and her art:
Wanda Pépin is a professional internationally collected artist who paints primarily with a palette knife. She lives and works from her studio in Southern Oregon and Northern NY state. She is primarily a self-taught artist with an extensive background in graphic arts and marketing. Although considered a self-taught artist, she really credits the many interactions she's had with other artists who have inspired, mentored and befriended her throughout her career.

Wanda has enjoyed art her whole life. She works as a professional artist doing commissioned paintings, gallery shows, private exhibitions, and selling her work online. Many of her paintings are held in private collections around the world, such as Cyprus, Australia, England, Canada, Mexico, etc.
Her newest piece, 'Kaleidoscope Trees', is an 8x24 painting: 
Such beautiful colors!!
You can also read about the group of students in the UK who chose Wanda as their artist of choice to study for their class project: http://wandawonders.com/artpages/newsandevents.html

Art Prints
Wanda has many gorgeous works of art in her online Portfolio. 
Pop on over to see what she has going on at:
http://www.wandawonders.com 

She also has an art and fashion blog called Timeless Fashion and Art that you must check out:


I feel so inspired after looking at her art.  I'm going to have to get past my own artist's block and put paintbrush to canvas very very soon....

Sherry


Continue Reading ...

7/10/12

Summer's Bounty

I love summer and all that it brings.  Sunshine and BBQ's.  Water fights.  Laying in the pool on floaties.  Fresh produce and so much green!

Remember our little raised garden bed?  You can read about it's origins HERE.

Just a tiny little piece of real estate to contain a few vegetable plants and satisfy that need I felt to grow a garden.  I've been watering it faithfully and watching expectantly...
 
It has been fun watching it grow and expand.  We got a nice little crop of radishes early on and now we are waiting for some string beans, tomatoes, peppers (sweet and hot), zuchini, onions and carrots to mature!  I  could not keep my little lemon cucumber going unfortunately.  :(


It's really taken off lately...


The string beans could probably use another 4 or 5 feet of climbing net!  The tomatoes have filled in their little quarter section nicely, and the zuchini is ready to branch out and explore the surrounding areas...lol.  The kiddos and I munched on a couple of "baby" carrots today.  Yum.  :)

 And finally, I have caught glimpses of tiny little green tomatoes!  And I look forward to the day when I will be able to pull a big, sweet and juicy tomato from the vine and slice it for fresh-from-the-garden tomato sandwiches with fresh ground pepper.  I might even have to try some of the olive oil mayo on my fresh tomato sammy! 


I have a columnal apple flanking the door on the back deck...along with a fig on the opposite side.
Say HI to Sadie!!!


After years of babying this little lady, she has finally offered up her first apple.  Seriously.  It took years.  I was starting to worry that I would never see an apple from this sweet little tree.  Perhaps she doesn't like being confined to a pot so much...but here is my little prized beauty:

Do you think it will be sweet?


And, of course, we have plenty of baby figs!!!  What on earth will we do with figs???  Any great recipes or ideas for fresh figs that you want to share?  I would love to try them.  :)


Continue Reading ...