-
Showing posts with label refinish. Show all posts

12/4/11

Upcycled Radio Cabinet

Is it Happy Hour yet?

Just kidding!  I shouldn't drink when I'm DIYing!
But check this out...
This old 1930's Sears Roebuck, AM Radio Console was sitting in some guys shop, just rotting away.  His lease on the shop was ending that day and he had to clear everything out pronto ~ that's how we became the lucky new owners of this beauty.  The radio workings were pretty much trashed and pieces were dropping and hanging off of it.  That didn't matter, because we could see the hidden potential it contained.  Mr. Clean cleaned out the old, broken radio parts.  And dust and spiderwebs and bug skeletons.  Eeeek!  Then he got out his handy little hand sander and went to town.  Right there in the middle of my craft room!!!


Taking his time and going with the grain of the wood.  He really does nice work...just wish it wasn't inside the house!
  

At the very first sun break he was sent packing to the back deck, because somebody was getting a bit tired of all the sawdust on every surface in the house.  Don't worry about him out there...he needed some fresh air ( and probably a break from my constant chatter and helpful suggestions )!

He had to get out some special scrapers to get into all of the little grooves and detailed wooden pieces on the front.  I always leave those kinds of details to him.  ;)  He's better at details than I am.

He wears that mask well, doesn't he?

Some of the wood trim was lifting up, but he had a fix for that too.  A touch of wood glue and some heavy objects to hold it down where the clamps couldn't reach.

They really did some gorgeous woodworking back in the day.  Fine AMERICAN craftsmanship.  This baby was built to last.

Gonn Iggulden's  'Dangerous Book For Boys'  was utilized for this tough task.  We knew that book would come in handy when it showed up under the Christmas tree a couple years ago.


Some scrap pieces of wood were cut to fit inside to create some shelving.   
(And here's a wonderfully blurry picture just in case you wanted to feel dizzy.)

More trim was added for specialty storage (you'll see).


He added back some of the vintage charm with the old knobs and the cracking, buckling radio dial.  Oh, how I wish the radio components could have been salvaged.  Some things are just not meant to be. 
Sigh...

Here she is in her restored glory ~

Sporting some of her new friends...

Showing off her sexy curves and classy lines.  Her hardware giving off that well-aged, but still hot, vibe.  Oh yeah.


And when she turns around ~ you see what she really has to offer!!!
Cocktail Anyone???


Built in stemware hangers, wine bottle storage and plenty of room for all of the extra bar accessories and beverages.


Sadly, the front panel with the radio dials broke.  It was old, brittle and cracked already so it didn't take much.   That left Scott with a little challenge ~ trying to figure out how to fill the void that was left behind.  He finally decided on a little chalkboard for personal messages.  Makes it more fun and gives it some personality.  It could say "WELCOME" if you are having an open house, or "FREE REFILLS" for a girls night..."HELP YOURSELF" would be kinda nice at an intimate gathering of friends or family.  Maybe "WINE TASTING HERE" for a cheese and wine party.  The possibilities are endless. 
I thought this message was kinda fun myself:

Please take a moment to leave us some comment love.  My Handy Man would be especially thrilled to hear from you since this is his first solo project here on P3 ~ so leave a few words of encouragement for him if you have time.  And Thank You for stopping by to check out what we've been up to.  It really means a lot ~ to both of us.  :)

Don't forget to click on that follow button on the left sidebar and like us on Facebook so you can see all of our upcycles, makeovers, DIY projects and tutorials (if you can call them that). 

Goodnight Friends!
Sherry


This project has been featured at:


Also Sharing At:

Continue Reading ...

11/20/11

Dining Set Makeover...When Will I be done???

ALMOST DONE!!!  I'm so impatient I had to stop and take some more pictures of my progress. 

BEFORE:

AFTER:


Some wax and a couple coats of poly and I'm calling it good.  I want to move on to some NEW projects.

Hope you are having a productive weekend...or a relaxing one...whichever you prefer!?

Continue Reading ...

11/14/11

From Old to New to Old Again


What a busy weekend. 

I spent hours putting a second and third coat of paint on the dining chairs and table.  Sunday morning I could barely get out of bed, I was so sore from all of that stooping, squatting and bending down.  So everything (except the table top) got a couple coats of fresh white paint and they look stunning!  I decided to add another coat of paint to the doors of my craft cabinets while I had the paint supplies out.  Check out my poor floors!  They are really taking a beating with all of this indoor DIY activity.  (Don't tell the hubby but I'm secretly hoping to paint or in some way refinish those floors someday.)  The floors were recycled from a family members remodel that my husband helped with, by the way.  I don't have NEW wood floors in the budget, but I have to tell you ~ I have a strong dislike for wall-to-wall carpet, especially of the off-white or light beige family.  What can I say?  I run a preschool in my home during daylight hours and children are tough on carpetingWho knew???  

Okay, back to the table...

Here she is after several coats of white paint have been applied
 And here is a look at the set with the chair cushions on.  Isn't she pretty?  (And My Honey got the doors put back on the craft cabinets while I was out shopping for glaze...HE'S SO AWESOME!)


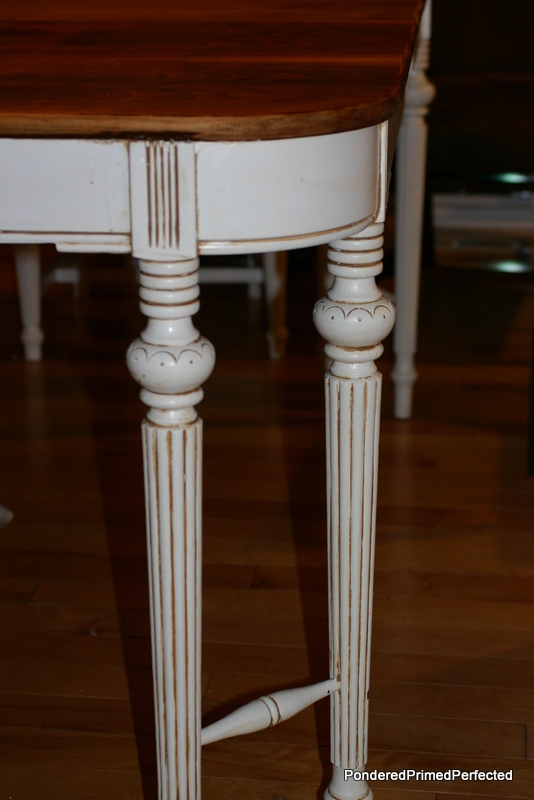
And a close up of the detail on the table:

Check out that walnut tabletop.  That makes my Handyman happy!

White is nice but I wanted to give the table some real character and also find a way to tie the white of the table legs and the chairs to the gorgeous color of that walnut tabletop.  So, I have ventured out into that dangerous unknown territory of glazing.  I watched a tutorial that I found online and I was ready to go.  The glazing process is pretty simple.  You just mix a cup of glaze with two tablespoons of acrylic or watercolor paint and stir.  You apply the glaze to your painted surface and then wipe off the excess, leaving the glaze inside the cracks and crevices to bring out those details.  Pretty simple!  I still have half the table and five chairs to finish glazing but hopefully I can conquer some each evening this week.  I am extremely pleased with how this dining set is shaping up.  My man even said he really likes what the glaze does to the overall look of the table.  Of course he is a big natural wood fan...good thing I'm leaving that tabletop unpainted, huh. 

Look at how those details POP now.


 Hope you have a fun week and find time to work on some projects of your own.

Enjoy your projects!
Sherry


Continue Reading ...

11/7/11

Look What My Husband Dragged In:

Look What My Husband Dragged In:
He was driving down the street, minding his own business, when he noticed someone putting these chairs out by the curb with a sign that read
"FREE TO A GOOD HOME". 
There are five chairs including a Captain's chair AND a dining table with three leaves!!!
(You can just barely see the corner of the table in the above picture).   Yes, you heard me right, five chairs and a dining table that can seat 8 comfortably.   Wow.   ALL. FOR. FREE.    Talk about being in the right place at the right time!

Check out this Captains chair:
Isn't it amazing? I love it!

And here is The Man of the Hour ~ cleaning all the gunk and grunge off the chairs so they can be painted a nice fresh white.  He doesn't even blink anymore when I say I want to paint something white.  He always gets this cute little twinkle in his eye when he asks what color or finish I might want to do a piece of furniture in.  Hmmm, wonder what that is all about?  I think I'll have to branch out and pick some new colors ~ just to throw him off a little!  I talked him into letting me use spray paint.  I keep seeing amazing photos of spray paint transformations in blogland and on Pinterest and I just wanted  to try it for myself.  He is reluctant to let me have my way with them but he hesitantly gives me full artistic reign...


Here is the fabric I chose to recover the seats:

Check out the old fabric (below)!  I had to use it as a template to cut the first one...yuck..ugh...blah...pfff...
This is just the first layer I removed.  Underneath this was another disgustingly bad layer in a horrid gold color.  STINKY!!!
I removed both layers of fabric and used one of them as a template to cut the rest. There's a very large print I wanted to center on the seat cushions. Maybe doing a print like this was a bit risky for me to tackle...especially since I am a beginner and havent recovered anything in a long time.  Once I had the design centered I pinned the template to the new fabric and cut it out.  After the first one was cut I used it to cut the rest; lining up the design to ensure that the chair cushions matched instead of having the print randomly placed. 
First one cut ~ only four more to go!
All five cut and ready to be attached!!!

Tools for recovering the seat cushions.
                                                                                                      
Here I am (below) stretching and stapling.  I put one staple in the center of each side first.  This allowed me to get the fabric right where I wanted it and make sure that it was stretched nice and tight before finishing the rest of the stapling.  Better to check the placement now than to wait until all the staples are in and have to remove them all later!   (I probably could have pulled it even tighter than I did.)
Stretching and pulling


TA ~ DA!!!
Stapling - what fun!

The first cushion is finished...not exactly centered but good enough...

(I had to plop it down on the chair to see how it looks!)

Aren't they adorable?

Spray Paint Time!!!!
Next they got a fresh coat of spray paintThis was nowhere near as easy as it sounded!  I learned I need a lot of practice at spray painting furniture.  The Man just kept peeking out the window at me and shaking his head.  Poor guy.  I have to give him credit for not coming out and confiscating the spray can!  I would probably have done that to him if I saw him doing what I did.  It was hard not to get too close and when I did it just caused the paint to run.  Not only that, but it seemed I wanted to do a complete finish in one coat.  That's just not going to happen!  Eventually The Patient One came out and gave me a little spray paint tutorial right there on our deck.  I really tried to do it like he showed me:  keep the spray can about 10 inches from what you are painting and use short, light, even strokes.  (And that's about what the directions on the back of the can suggested too.)  Ha.  I just wanted to spray the whole thing as quickly as possible and be done with it!  I never claimed to have a lot of patience!!!

They still need another coat of paint. I think I will add some glaze to bring out the beautiful details in the legs.  It might be a good idea for me to watch a tutorial (or two) before tackling the glazing step...just sayin'...

AREN'T THEY GORGEOUS???
Can't wait to show you what the table looks like once we get it done!  Soon I hope...


Enjoy your projects!

Sherry


Continue Reading ...