-

6/10/12

Making Progress ~ sneak peak at THE NOOK


We don't have any "finished" projects to share yet.

We were too busy watching my nephew do this:

WooHoo!!!  Way To Go Luke!!!


This is our upstairs "nook".

AKA ~ THE NOOK

We designed this area as a little gaming/movie watching area.  I wanted this built in wall shelf to display Scott's growing collection of cribbage boards.  Scott just got the little cross shelves cut down to size and he was so excited that he had to put all the cribbage boards up there to see how they would look even though the shelves aren't done being painted.  The shelves will eventually get a coat of white paint like the rest of the built in.

I love this space...


Scott put the leftover wainscot wallpaper along the backs of these built ins for some added texture and cottage-y character.  The flooring is recycled hardwood we got from a family member's remodel.  I detest wall to wall carpeting.  (Sorry if you are a carpet lover, I really don't mean to insult.)  I would prefer hardwood with an area rug any day.  It's so much easier to clean and maintain.  I have children and I care for more children for a living.  Children change your perspective on carpeting!  Someday I hope to have the entire house finished with some type of hardwoods and just have area rugs where needed.

Until then...


The Craigslist sleeper sofa was the perfect size for The Nook.  When Alex has a sleepover they can pop in a movie or game and pull out the sleeper bed.  He's already tested it out!  I got a photo of him and his buddy passed out here but he made me swear not to blog it.  I cannot go back on my word.  (I must hide my camera better next time so he doesn't know what pictures I have on it!  lol!)


Just a bit of white paint to finish off the shelving and a few more details and this area will be done.   I'm hoping to make a comfy slipcover for the little sofa...maybe in a charcoal gray???

See in the corner of the above photo...the half-wall surrounds the stairs going down to the first floor.

It's hard to believe that this area used to be part of a two story entryway...it was open all the way up to the second floor ceiling.  It was a lot of wasted space ~ but not anymore!  There was an ugly brass chandelier that hung down over the front door.  I wish I had a photo to show you but we did this addition before I started blogging and I FAILED TO TAKE BEFORE PHOTOS.  I'm so disappointed about that!  Let this be a lesson to me (and you)...even if you don't blog about your projects...take a durn photo so you can compare the BEFORE and AFTERS!!!


Scott was extremely excited to get this little 27 inch flat screen tv on his birthday.  It's our first flat screen TV!  LED, 1080P, back-lit, HDTV, HDMI, PC connectivity and much more!  Don't ask me what most of that means.  I have no idea...but I was smart enough to listen when he talked about them so I could hopefully get a good one for him.  He quickly added an electrical outlet right into the ledge of the built in shelf so that the tv cord would not hang down along the wall.  He also added additional outlets in the walls for laptops, Blue-ray players and gaming systems if needed.  I knew he would do that.   He's so darn handy!  And Alex was nice enough to point out that the XBOX 360 is also a Blue-ray player so we should just get one of those. Wink, wink.


This cribbage board is my favorite.  I found it at an estate sale.  I believe that 29 is the highest hand you can achieve in Cribbage.  I wouldn't know because I've never been lucky enough to get a hand that high.  I can occasionally kick Scott's hiney though.  He likes the challenge.  I do a pretty good job of harassing him if I beat him at a game.  I'm not the best at strategy games so I have to take my shots where I can get them!  Right?

What projects have you been making progress on?  I would love to hear about them.

HAVE A BEAUTIFUL WEEK MY FRIENDS!

SHERRY


Continue Reading ...

6/4/12

Easy and Inexpensive Deck Chair Pad


 Check out our plain old deck chairs.  

Before you make fun of them you should know they were a bargain.  Four chairs, a table plus a shade umbrella were only $99.  We've had them for a few years and they work great for outdoor dining or hanging on the patio with a glass of lemonade (or a margarita ~ that sounds so good!).  The backs recline and they weather well ~ which is important here in the Pacific Northwest ~ because you never know when it's going to rain.  Well, actually, it's more like you never know when you might get some sunshine!   The woven seat was just not very comfy for lounging.  (Can you picture the lovely woven imprint they left on our thighs?  Not cool.)


How about these chair pads?  How sad is this picture with the schlumpy chair cushion?  These just won't work!!!

So, when I saw the adorable blue striped towels on sale at a department store for $2.99 each I thought, "I can do something with these!"

Let's see what I can do...

You know, for sitting around sipping lemonade (or margaritas!!!).


I am LOVING the stripes...COOL!


I took my scissors to the two old pads and cut off the covers.  I ended up with four pads that I cut down to the size of the chair seats.  No going back now!


I laid the towel down wrong side up, put the pad on top of the towel, then folded the towel back over the top of the pad.   I cut the excess towel off ~ leaving enough fabric to fit over the pad as well as about a 3/4 inch seam allowance on each side for stitching closed ~ plus extra for turning and hemming the rough-cut edges.  (Big breath after that run on sentence!)


I turned the rough edges up TWICE and pinned them that way ~


Then I sewed a new hem where I had cut the towel down to size ~


After the hems were done I folded the towel with wrong sides together, placed the pad inside and sewed the entire piece closed along the previous hems...doing this left the previous hems to resemble double "welting" ~


 First one done!  Only three more to go...  Check it out ~


These cushions are so soft and comfortable for our hineys.  No more imprints!!!

Perfect for basking in the sun...whenever that day finally comes.........................................................oh, forgive me,
I got lost in that fantasy for a minute!


And I'm playing around with some accessories to liven up the space.  I will show you the complete transformation when I'm done, but here are a few of the things I'm tossing around ~


An empty blue frame surrounding a garden art plaque...hmmm...not sure yet...

A couple of signs from Target's dollar section ~


...some .50 cent garage sale lanterns hanging from plant hangers ~ battery powered candles for ambiance.

Can't wait to show you the space when it's done!

Big HUGE thanks to Beckie Farrant for sharing our Raised Garden Bed on Roadkill Rescue...go take a look and please don't forget to tell Beckie that Sherry from P3 sent you!  

You can see her post HERE


Continue Reading ...

Welcome to Inspiration Cafe ~ OPEN EVERY MONDAY 'TIL LATE

Thanks for stopping by!!!  

We are hanging out with sweet Natalie from Northshore Days today. 

I love Natalie!  

She is so talented and she has such a cheerful and positive presence...even across oceans.  
I think you're gonna love her too.  

Meet Natalie:


Coming Soon...... 5 more sleeps


Hello Everyone and welcome to our very first Inspiration Cafe post.. So exciting!!!

So grab your coffee and lets get started.

Just a quick little intro about myself...

My name is Natalie and I am the lucky mum of 3 lively, sweet kids and wife to an awesome hardworking man. I live on the beautiful NorthShore in Auckland, New Zealand and I blog about my crafts, love of all things painted white, Jewelry and kids at Northshore Days.

Me and my beautiful Payton


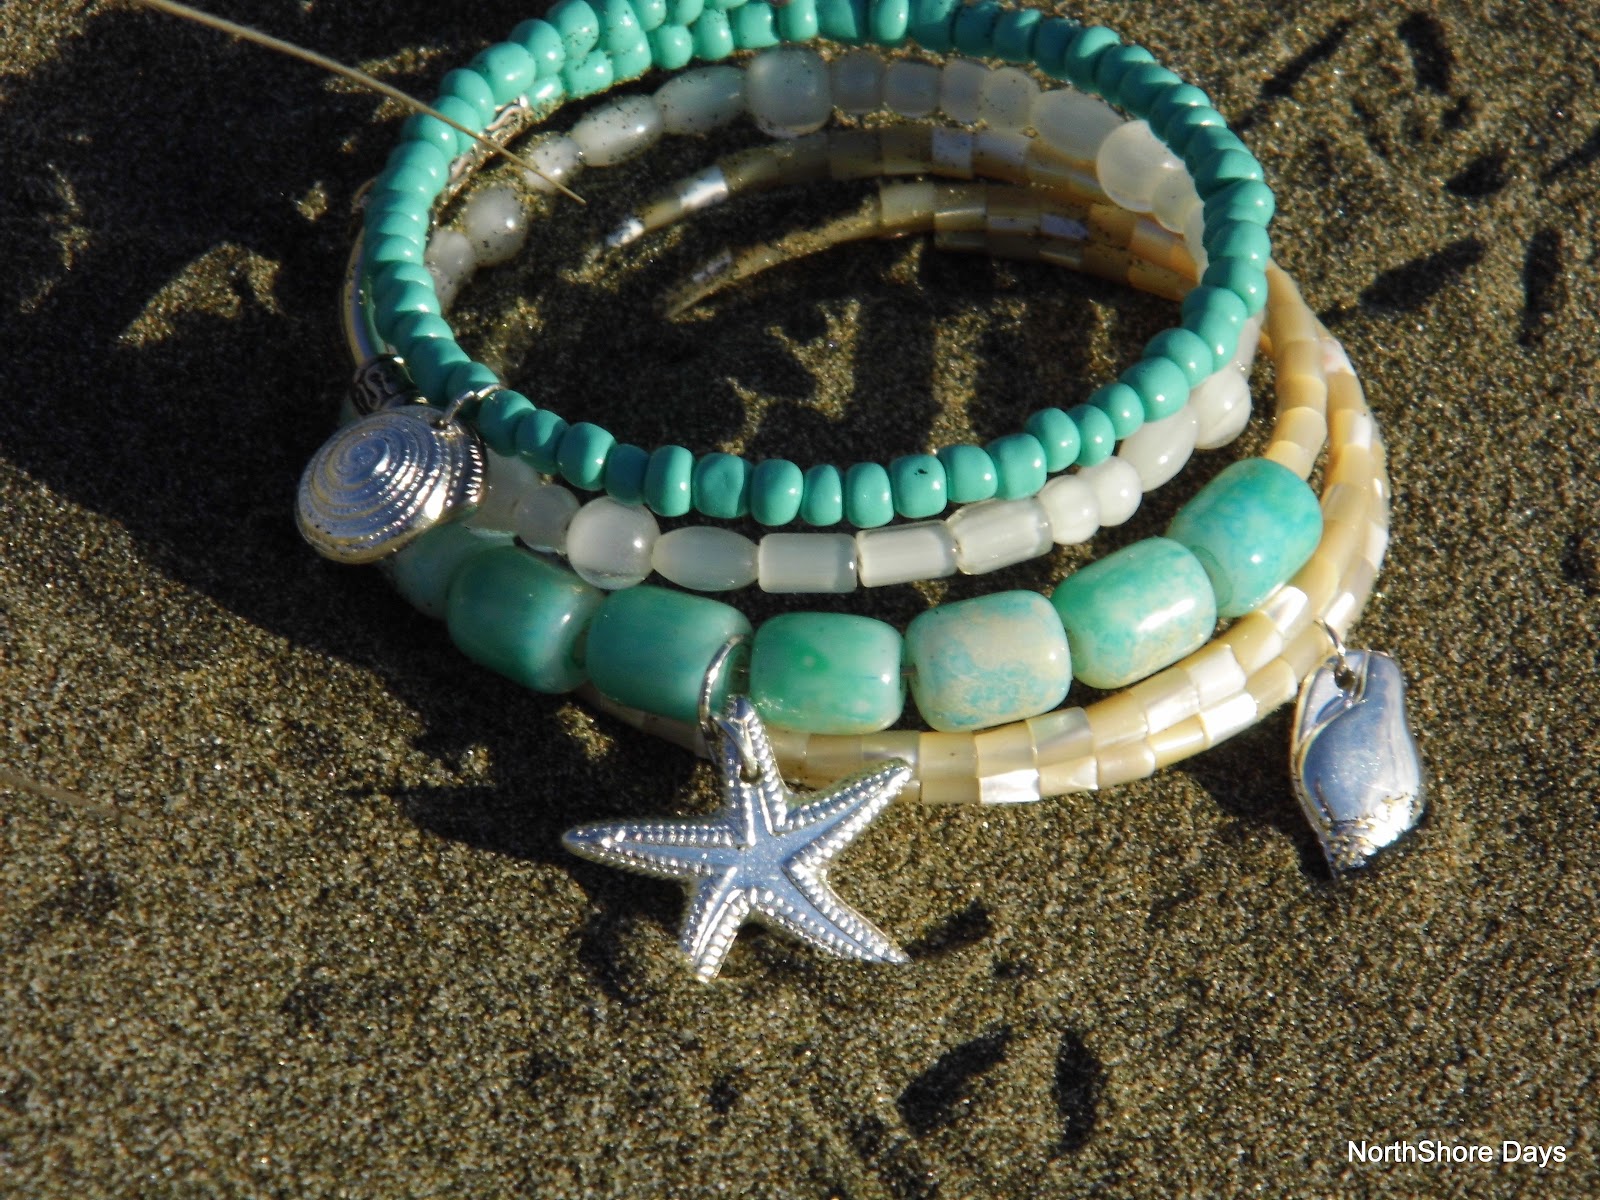
Today I'm going to show you how I made this beachy bracelet. 
Its really easy and of course the sky is your limit with projects like this.

Recently I discovered I actually liked memory wire after years of avoiding it for some reason. So I'm loving creating all kinds of looks with it. And I have been inspired, quite a lot by my environment, last month I created a Winter inspired bracelet and this week the beach has been calling....

The image I had of the beach is one of my favourites (and its my blog header too). Look at the rich colours, the sand and the greenish hue of the sea. It threatened a storm that day and there was a yellow tinge to everything.


What you need: 

beads of varying sizes, shapes and colours
charms for your theme - I used shells and starfish
jump rings to attach the charms to the bracelet
memory wire cut to your desired length - mine wraps around my wrist 5 times

Using a pair of long nosed pliers bend one end of the wire to form a loop. 
Then thread your beads and charms on, and end off again with another loop.
 So simple!
However, if you're anything like me, you will re-thread your beads over and over untill you're happy with the look...


 Then you throw your family into the car for a trip to the beach and a photo shoot....


 I think this is by far my favourite creation yet. At least when I wear it this winter it will remind me of the beach and put some cheer into our cold dark days.
 
 I hope you enjoyed our first post and that you feel inspired to create this week.

Let us know if you make any of our creations - we would love to pop round for a visit to your blogs.

We will see you again next week, Mary from Sweet Little Bluebird will be sharing a yummy recipe with us all.

Don't forget to leave some comment love...

Take care

xxx

 
Photobucket
Continue Reading ...

6/1/12

Introducing Inspiration Cafe

Opening This Monday, June 4th !!! 

You don't want to miss it... 
I will be taking part in an exciting new blog adventure with some amazingly talented Bloggers and Friends.  
So stop back by on Monday for our first installment of Inspiration Cafe.


Hello and Welcome to Inspiration Cafe 


We are 6 bloggers who have joined forces to provide you with some weekly inspiration, great tutorials, gorgeous decor and awesome DIY projects...

Grab your Latte, make yourself comfy and lets meet our team:
 
Simple Jewelry Tutorials and Tips from Natalie
NorthShore Days

_______________

Delicious Recipes from Mary
Sweet Little Bluebird
_______________


Fun and Easy Crafts by Danni
Silo Hill Farm
_______________

Awesome DIY projects by Sherry
Pondered Primed Perfected
_______________


Beautiful Sewing, Quilting and Crochet by Heather
The Beating Hearth

______________

Easy, affordable, innovative home decorating with Julie


We hope you enjoy your visit and we would love for you to pop around to our blogs and stay a while.

Remember we are open every Monday 'till late....Don't forget to tell your friends

 Thanks for stopping by today.
,
xxx

Natalie, Mary, Danni, Sherry, Heather and Julie 

at Inspiration Cafe


Continue Reading ...

5/31/12

STOP and SMELL the FLOWERS

Some days you just need to stop and smell the flowers...


*All flowers courtesy of our garden today. 

Thanks for stopping to smell the flowers!  Hope your day is beautiful.

Sherry


Smelling the flowers at:
http://maleviksrosentradgard.blogspot.com/2012/06/saturday-show-off.html
Continue Reading ...