-
Showing posts with label painted furniture. Show all posts

4/5/16

Dumpster Dive Dining Table Gets a New Home


We rescued this beauty from the dumpster at our apartment building. 
 It really wasn't much...


An inexpensive department store table probably passed on to a college student who didn't have much of anything.

It sat in my sister's garage for months.  Out of sight out of mind.  Then a month before Christmas I heard my daughter talking about how she wished they had a real dining room table in their apartment.  All they had was a tiny drop leaf table that wasn't meant for dining.  Wouldn't it be nice if they had a full sized dining table so they could have company over for dinner?

I quickly quizzed them on their preference in stain and paint colors and went to work...in the middle of our town-home living room.  

Well, the sanding I did in my sister's garage.  

We stained the top with a Minwax stain/poly combo product and painted the pedestal in a taupe/gray color. I added a final layer of Maison Blanche Organza Shimmer Coat to Jazz it up a bit.

The finished table..


They already had the two chairs.  


The shimmer coat really makes the pedestal stand out.


The chairs need their own makeover day.  But that's another story.


Who said you can't complete a big furniture makeover in an apartment?  But beware...you might get a little light headed from the fumes... :)

~Happy Project Day~
Continue Reading ...

7/28/13

How this pair of washed out, homeless, 'down on their luck' nightstands got a second chance at life. A tutorial.

These nightstands have been waiting for a second chance at life.
...and waiting...
...and waiting...
But I started a new job just a few weeks ago and everything changed.  I haven't had any spare time for makeovers or ANYTHING extra really. 

Then something amazing happened this weekend ~ we didn't have ANYWHERE to be so I got to stay up late...
...and sleep in...
...and work on these beauties!

Hurray!

They've come a long way.

But you need to know haw far they've come to appreciate their journey.
They were sad little boxy nightstands left abandoned on a Portland side street when we found them.   They had NO LEGS.  
One of them had a sticker on the back that said 'Pair of oak nightstands $640.00' so apparently they were something special back in the day.  But when we found them they just had a crooked piece of lined notebook paper taped to the front of one aged door reading 'FREE'.  

Seemed like a good challenge to me.


It never ceases to amaze me what a little paint and elbow grease can do to transform old furniture.  For this little duo I went with a Dutch Boy paint & primer in Cathedral Grey.


First I removed the hardware and doors then sanded them down inside and out.  Then I gave them a good wipe down with a damp cloth to remove all dirt and sawdust.  I applied a couple coats of Cathedral Grey with a paint brush, letting them dry completely between coats.


I'd found these wooden legs at Goodwill and bought them when I was planning to make an ottoman but then I didn't need them (you can see how I made that ottoman HERE) so they came in handy for one of the tables.  We just went to our local Builder's Supply store and bought four more.  There were other types of legs but I like the 'retro' look of these to go with the older nightstands.


We also bought the metal pieces that attach the legs to the base of the nightstands...


The metal brackets get screwed to the table and the legs screw into the brackets.  Easy!


They were looking good with the new paint color but they certainly couldn't go around with those bare legs showing.  How inappropriate!


I taped over the brass ends before painting then stuck the legs upside down in a cardboard Nike box to dry.  The same box was used to hold the hardware while being painted.


The shiny white hardware may be my favorite part about this duo.


Then again the way the white glaze brings out the detail on the doors is pretty nice too.

The glazing gave them so much more depth...and the cute little legs gave them the height they needed to work in our space.


And WOW do they work in our space!


Free Nightstands
$1.00 jar of paint from Habitat for Humanity.
$20.00 wooden legs and metal attachments.
Glaze, white paint and white enamel spray from our stock.


That's $21 dollars to beautiful!!!


Have you ever found furniture on the side of the road that was just begging to go home with you?  I would love to hear about it if you did.


Continue Reading ...

6/9/13

Hanging Out on the Summer Porch ~ A Painted Icebox Story


This old icebox was passed on to us years ago and it's played many roles in our home...
*tv cabinet
*end table
*bedside table
*and most recently it hung out on our back deck for the summer.


But I switched the big bench from the front porch to the back deck and so this icebox and folding chairs ended up here on the front porch.  The big bench is heavy and so it's a stay put kinda guy and these lightweight chairs are easily moved wherever the shade is.  I like having the option of moving my chair to a better spot if I want to!    


But this poor old icebox really has seen better days, don't you think?  The weather from last summer really did a number on the finish.  And although this piece is cute ~ it's clearly a "fake" icebox and so it's not going to win any restoration awards for me.  So I figured I'd have some fun with it and paint it a happy color to liven up the front porch area.


Ace Hardware had their big Grand Opening Celebration last weekend and I got this sample quart of paint for free there.


I was going to go with a cheerful yellow (by popular vote on facebook) but the hubby voted 'NO' on yellow and well, his vote made all the difference since he also has to live with it.  Sorry to all of you yellow voters out there!!!  Quite honestly I was surprised that he picked this color out of the three choices I showed him.  

I thought for sure he'd choose the green or yellow first.


I sanded the old finish off with a sanding sponge before giving it a new coat of paint.  I didn't use a separate primer just two coats of Clark + Kensington Paint + Primer In One in 'Stepping Out'.  :)

Very nice paint with great coverage, btw.


We love our little front porch with our Family Established Porch Sign


And the gorgeous hanging basket we purchased from the High School Baseball Fundraiser.  Best idea for a fundraiser EVER in my opinion.  I love my hanging flower baskets!!!


Just a few details to make this space feel really welcoming and CHEERFUL.
  • Icebox Drink Table in a fresh new color
  • Some fun floral pillows
  • A sweet Dahlia in a vase (fake)
  • Some ferns on tree stump end tables (soon to be painted stumps, I think!)
  • A soft apple green rug


It didn't take Sadie long to realize there was a nice soft rug here.


I think she approves of the new porch makeover...


...especially the soft place to lounge.


Sadie says it's perfect for chilling on a lazy summer day.

Oh, what color do you think I should paint those stumps?  White or gold or some combination of both?  I can't promise you Scott won't trump the popular vote but I would still love to hear what you think!

Thanks for stopping by today to see what we've been up to.
Enjoy the Summer sunshine and stop to smell the flowers from time to time  :)

I know I will!
Cheers,

Sherry


Sharing With:
http://www.natashainoz.com/2013/06/say-gday-saturday-linky-party-71-link.html?spref=tw
http://www.justusfourblog.com/2013/06/pinworthy-projects-party-66/#more-2229
http://www.savvysouthernstyle.net/
http://alittleclaireification.com/
Continue Reading ...

5/20/13

When that little voice inside your head says "paint the bed"...you paint!


My parents gave us a King Sized Sleep Number adjustable mattress.  They decided they would be better off with another type of mattress and so they generously brought their sleep number up and delivered it to us.  Many thanks to my wonderful parents!  We also got brand new memory foam components from the Sleep Number company.

You have no idea how much we appreciate you and your generosity, Mom and Dad!!!

So here is how our Master bedroom looked on Friday night.  How's that for red and dated? (below)


We were so excited to be getting a dual adjustable bed, especially because Scott likes his bed FIRM and I like my bed SOFT.  Can you believe it?  On another note, it is our 13th wedding anniversary today!  And that's about how long we've had this knotty wooden bedroom set.  Actually, I think we bought it when I was pregnant with Alex so we would have room in our bed for Scott, Myself and my big belly!


Of course getting a new mattress fueled the fire to change our bedroom.  It was long overdue.  I've had the paint for months...many months.  Sometimes I get all 'painted out' for awhile.  But it was time for that decade old, dated red TO GO!  It sucked all the light out of our room.  Great for sleeping but not so good for anything else.  We needed calm and peaceful, BUT we also wanted light and cheerful.  And so I pulled out all the painting supplies and got busy Friday night after work painting the walls with my helper, Alex.  Best to get the walls painted while the old mattresses were off the bed and it would be easier to move, right?  So I pulled the bed out from the wall and got to painting.  But that little inner voice in my head just kept at me, saying "You know you want to paint the bed...you've wanted to for a long time."  And I knew it was true but darn, painting the entire room:  the walls, the trim, PLUS the bed, was a lot of work in one busy weekend!  And I really did not want to take that bed frame apart and carry it downstairs by myself while Scott was away at tennis championships.  NO WAY!  And the thought of not finishing and being left without a bed for any number of nights...NOT GOOD.  It is our anniversary today...did I mention that!?  ;)


But late Friday night while Alex was sleeping and Scott was away, that inner voice started whispering to me again..."Now's your chance!  There's no mattress in the way, you've cleared the room and you've already got all of the painting supplies up here."  And so I grabbed a little roller and started painting the bed with some white paint...right there in the middle of the night...in the middle of the room...


Turns out a bed CAN be painted right where it sits.  Some cardboard under each leg so I could paint all the way down without getting paint on the floor was all it took.  Being extra careful not to paint the carpet or anything else in the room was important.  I just went with white because that's what I had and I'm very happy with the decision.  Even Alex and Scott like the white.  Yes, those men that are forever teasing me that I paint EVERYTHING white, said they really like it.  And so do I.  It is a nice, subtle contrast with the soft blue/grey of the walls.  And I like that the wall color makes it feel like we are floating on a cloud.

And the bed can be set to the perfect firmness for Scott AND me.  We feel like we are in heaven!  Thanks again Mom & Dad.

There's still much left to be done in this room, but for now we are loving the changes and taking our time deciding what color to paint the other furniture in the room.  If we decide to paint it.  Although the changes feel pretty good.

We still have an end table...


A big dresser with a mirror...


And the secretary desk (that came from my sweet grandma) I use as a side table to possibly paint....


A few more details and we might have an entire room makeover to share.  I think I just wore myself out thinking about all the things that still need to be finished...shwew...it may be awhile now!  Haha.  Let's hope not.  :)

Thanks for stopping by today to see what we've been up to!

We love that you are here!  Please take the time to click on your favorite method to follow (on the sidebar or that little purple bar conveniently located at the bottom of the page).  THANKS!

Continue Reading ...

3/28/13

Painted End Table ~ a Makeover ~ 3rd Time's a Charm(er)


Here's our little roadside rescue end table.

It came home with us looking like this:


but it had so much potential...


I thought I would give it some color and try my hand at spray painting.  

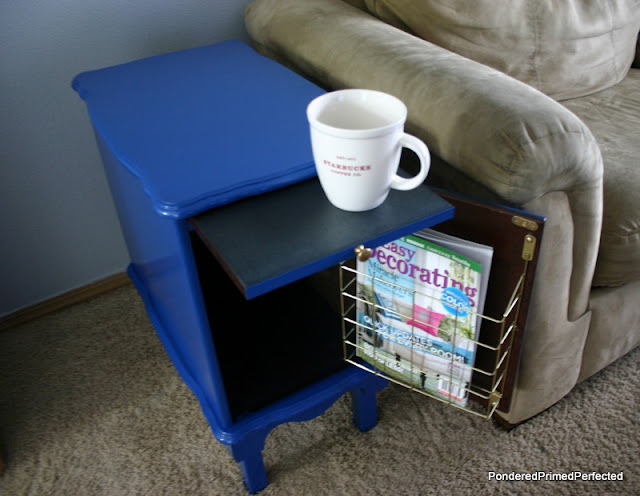
So it became this:


And we loved the rich blue.  For a time.

Eventually I wanted to use it in another space and the blue just wouldn't work.

So I gave it a couple coats of white paint,

then added in some Maison Blanche in Cobblestone giving it an entirely new look...


A quick coating of wax with a bit of dark stain mixed in gave it a little bit of aged character:


It's neutral enough now to go in almost any room in my home. 
This is good because if you know me you know I love to move things around...a lot.  :)


For now it finishes off this space nicely.


It definitely needs some oil rubbed bronze on those little knobs for some contrast.  
I'm trying to decide if I want to give it a monogram on the door front.  
The white raised panel seems to be asking for something but I ran out of the Cobblestone color so I couldn't finish it with that even if I'd wanted.  
What do you think?  Gold on the edges of the door panel?  
A Monogrammed Letter for our last name?  Any other suggestions?  
Thanks!


Sharing With:
Continue Reading ...