-

11/14/11

From Old to New to Old Again


What a busy weekend. 

I spent hours putting a second and third coat of paint on the dining chairs and table.  Sunday morning I could barely get out of bed, I was so sore from all of that stooping, squatting and bending down.  So everything (except the table top) got a couple coats of fresh white paint and they look stunning!  I decided to add another coat of paint to the doors of my craft cabinets while I had the paint supplies out.  Check out my poor floors!  They are really taking a beating with all of this indoor DIY activity.  (Don't tell the hubby but I'm secretly hoping to paint or in some way refinish those floors someday.)  The floors were recycled from a family members remodel that my husband helped with, by the way.  I don't have NEW wood floors in the budget, but I have to tell you ~ I have a strong dislike for wall-to-wall carpet, especially of the off-white or light beige family.  What can I say?  I run a preschool in my home during daylight hours and children are tough on carpetingWho knew???  

Okay, back to the table...

Here she is after several coats of white paint have been applied
 And here is a look at the set with the chair cushions on.  Isn't she pretty?  (And My Honey got the doors put back on the craft cabinets while I was out shopping for glaze...HE'S SO AWESOME!)


And a close up of the detail on the table:

Check out that walnut tabletop.  That makes my Handyman happy!

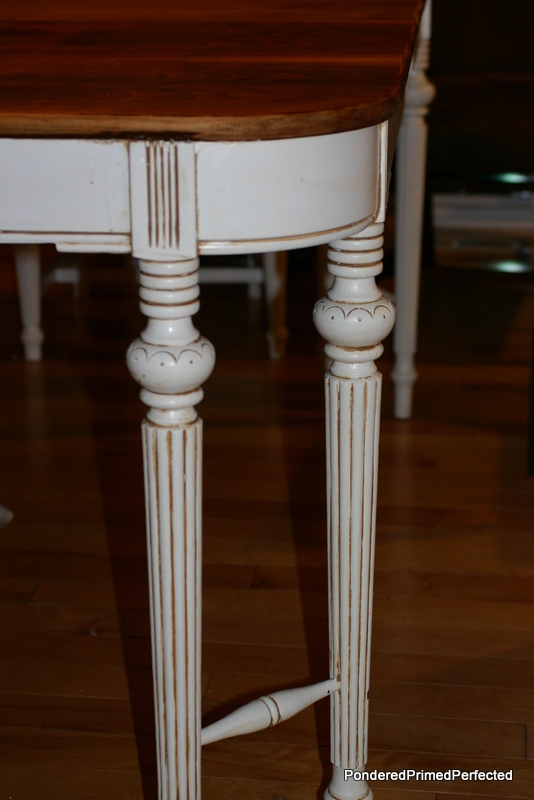
White is nice but I wanted to give the table some real character and also find a way to tie the white of the table legs and the chairs to the gorgeous color of that walnut tabletop.  So, I have ventured out into that dangerous unknown territory of glazing.  I watched a tutorial that I found online and I was ready to go.  The glazing process is pretty simple.  You just mix a cup of glaze with two tablespoons of acrylic or watercolor paint and stir.  You apply the glaze to your painted surface and then wipe off the excess, leaving the glaze inside the cracks and crevices to bring out those details.  Pretty simple!  I still have half the table and five chairs to finish glazing but hopefully I can conquer some each evening this week.  I am extremely pleased with how this dining set is shaping up.  My man even said he really likes what the glaze does to the overall look of the table.  Of course he is a big natural wood fan...good thing I'm leaving that tabletop unpainted, huh. 

Look at how those details POP now.


 Hope you have a fun week and find time to work on some projects of your own.

Enjoy your projects!
Sherry


Continue Reading ...

11/7/11

Look What My Husband Dragged In:

Look What My Husband Dragged In:
He was driving down the street, minding his own business, when he noticed someone putting these chairs out by the curb with a sign that read
"FREE TO A GOOD HOME". 
There are five chairs including a Captain's chair AND a dining table with three leaves!!!
(You can just barely see the corner of the table in the above picture).   Yes, you heard me right, five chairs and a dining table that can seat 8 comfortably.   Wow.   ALL. FOR. FREE.    Talk about being in the right place at the right time!

Check out this Captains chair:
Isn't it amazing? I love it!

And here is The Man of the Hour ~ cleaning all the gunk and grunge off the chairs so they can be painted a nice fresh white.  He doesn't even blink anymore when I say I want to paint something white.  He always gets this cute little twinkle in his eye when he asks what color or finish I might want to do a piece of furniture in.  Hmmm, wonder what that is all about?  I think I'll have to branch out and pick some new colors ~ just to throw him off a little!  I talked him into letting me use spray paint.  I keep seeing amazing photos of spray paint transformations in blogland and on Pinterest and I just wanted  to try it for myself.  He is reluctant to let me have my way with them but he hesitantly gives me full artistic reign...


Here is the fabric I chose to recover the seats:

Check out the old fabric (below)!  I had to use it as a template to cut the first one...yuck..ugh...blah...pfff...
This is just the first layer I removed.  Underneath this was another disgustingly bad layer in a horrid gold color.  STINKY!!!
I removed both layers of fabric and used one of them as a template to cut the rest. There's a very large print I wanted to center on the seat cushions. Maybe doing a print like this was a bit risky for me to tackle...especially since I am a beginner and havent recovered anything in a long time.  Once I had the design centered I pinned the template to the new fabric and cut it out.  After the first one was cut I used it to cut the rest; lining up the design to ensure that the chair cushions matched instead of having the print randomly placed. 
First one cut ~ only four more to go!
All five cut and ready to be attached!!!

Tools for recovering the seat cushions.
                                                                                                      
Here I am (below) stretching and stapling.  I put one staple in the center of each side first.  This allowed me to get the fabric right where I wanted it and make sure that it was stretched nice and tight before finishing the rest of the stapling.  Better to check the placement now than to wait until all the staples are in and have to remove them all later!   (I probably could have pulled it even tighter than I did.)
Stretching and pulling


TA ~ DA!!!
Stapling - what fun!

The first cushion is finished...not exactly centered but good enough...

(I had to plop it down on the chair to see how it looks!)

Aren't they adorable?

Spray Paint Time!!!!
Next they got a fresh coat of spray paintThis was nowhere near as easy as it sounded!  I learned I need a lot of practice at spray painting furniture.  The Man just kept peeking out the window at me and shaking his head.  Poor guy.  I have to give him credit for not coming out and confiscating the spray can!  I would probably have done that to him if I saw him doing what I did.  It was hard not to get too close and when I did it just caused the paint to run.  Not only that, but it seemed I wanted to do a complete finish in one coat.  That's just not going to happen!  Eventually The Patient One came out and gave me a little spray paint tutorial right there on our deck.  I really tried to do it like he showed me:  keep the spray can about 10 inches from what you are painting and use short, light, even strokes.  (And that's about what the directions on the back of the can suggested too.)  Ha.  I just wanted to spray the whole thing as quickly as possible and be done with it!  I never claimed to have a lot of patience!!!

They still need another coat of paint. I think I will add some glaze to bring out the beautiful details in the legs.  It might be a good idea for me to watch a tutorial (or two) before tackling the glazing step...just sayin'...

AREN'T THEY GORGEOUS???
Can't wait to show you what the table looks like once we get it done!  Soon I hope...


Enjoy your projects!

Sherry


Continue Reading ...

11/3/11

Welcome! Craft Room Storage Cabinets

Welcome to  PONDERED PRIMED PERFECTED !  We are a forty-ish couple with two kids, a dog and a mortgage.  This blog will chronicle our PROJECTS together.  Big or small.  Success or Failure.  Laughter AND tears.  We won't always agree on how things should be done but in the end we make a darn good team and accomplish a lot.  We are not EXPERTS...  We both know a little about a lot of different things.  Come by to catch us improving, updating, replacing, re purposing, recovering, and refinishing whatever we can get our hands on. 


Mostly we just want to satisfy that creative voice inside of us that is just crying out to be heard...
We hope you will find something interesting, helpful or even humorous here!

Post #1!!!
This is my home office and crafting space:


My Creative Space
This room used to be our family room but we moved our television to the living room and now that's where the family hangs out. Go figure. ;) This room is a perpetual work-in-progress. It is where I humor the part of me that craves rearranging and staging.   It has become a multi-functional room ~ housing my home office and my craft supplies in those amazing louvred cabinets.  And NO, They are not finished!!!   I cannot wait to post about those cabinets being finished, believe me.  But for now...

Here is what they looked like when we brought them home from a friends garage ~FREE~:


And here they are after we (*most of the credit to my Honey) had added a nice fresh coat of creamy white paint:
(See that whtie desk?  That used to be our dining table until I had The Handy Man cut it down to desk size for my office/craft space...wait 'til you see what we did with the piece we cut off!  Future post alert!!)

They don't have doors on them yet because Stud Muffin kept having issues with brown bleeding through even after several coats of paint and primer.
What!?  Are you serious, Honey?  Let me try!!!
After a little eye rolling and a couple of chuckles from The Handy Man, I worked my magic.  Not with his fancy commercial sprayer, mind you.  I pulled out my trusty can of ivory spray paint and went to town. 

What!?  No more yucky brown smudges bleeding through? 
The doors are an entirely different color than the cabinet base but who cares?  We still have some trimming to do, some holes to fill and then I think another coat of paint to even out the color.  But for now I have filled them with all of my scrapping, crafting, drawing, painting, bill paying goodness. 


What do you think?

Finally, to show you just a glimpse of why we have so much fun together on our projects.  Check out what my Darling Hubby looked like when he came to tell me he had finished spraying the cabinets:


And here he is again after I told him what was so unbelievably funny:


Do you think he needed a bit more ventilation in that spray booth he rigged up out back?
(Sorry it's blurry.  I was just laughing so hard I couldn't hold the camera steady!)


Enjoy your projects,
Sherry

***Updated Cabinet***
Continue Reading ...