-
Showing posts with label repurpose/reuse/recycle. Show all posts

5/23/13

22 Clever Cabinet Ideas found on Hometalk

I'm a fan of clever ideas.

Many of my favorite projects involve taking something that is intended for one use and using it for an entirely different purpose.  The really cool thing about being a DIY blogger is we aren't limited by conventional ideas when it comes to our projects.  Everything we come across is seen as a possible makeover, repurpose, or upcycle project.  We are forever looking at the potential behind each and every yard sale, thrift store and roadside find.

I get excited when I see other peoples' ideas for the clever use of furniture.  There are so many great ideas out there.  And just to show an example of the creative ways people are finding to re-use furniture I've compiled 22 Clever Cabinet Ideas from  posts I've found on Hometalk.


Cabinets hold special significance for us here at Pondered Primed Perfected because Our Very First Blog Post Ever  was about a freebie garage cabinet that Scott and I cleaned up and painted to use as a craft cabinet INSIDE our home.  It was a fun project to tackle together (we learned so much through the process!) and that cabinet has been an invaluable source of storage and organization ever since:


But we aren't the only ones repurposing cabinets.

Here are just a few Clever Cabinet Ideas I found on Hometalk by doing a quick keyword search:

At the Picket Fence shared this cabinet turned fun game center, with a dart board inside and chalkboard doors for keeping score of all the good-natured competitions that are sure to happen.


You may not like having all your sewing stuff out in plain sight but want it handy when you need it, right?  How about creating a Sewing Armoire like A Southern Belle with Northern Roots shared on Hometalk.


Coffee, anyone?  I totally need a coffee bar in my home like this one, shared by Wit Wisdom and Food on Hometalk.  If only it came with a built in Barista!

And if you need something a little stronger than coffee...Eve of Reduction shared this sewing cabinet turned cool Beverage Cart.  I'm totally feeling thirsty now.  :)  

The above and below cabinets both remind me of the stereo cabinet that Scott and I repurposed into a fun mini bar.  We shared that post on Hometalk too.  See our Hometalk post HERE.

This old stereo cabinet, shared by Practips, makes a perfect bathroom vanity.


And speaking of bathrooms, check out this cabinet:
Recaptured Charm shared this kitty commode she created from an old, discarded cabinet.  
(When it's all closed up you would never guess what's inside!)


Maybe you don't need a cabinet inside your home anymore?  There are many clever ideas for repurposing cabinets for use in your garage, shop or yard too.

How about this metal filing cabinet flipped on it's back and drawers removed.  A little paint and pegboard create an ideal storage spot for all those long handled tools and whatnots hanging about in the garage.  Shared by Brightnest on Hometalk.

Or this mini potting shed made from an old Armoire and shared by Art is Beauty.


WOW!!!  Those were just a few of the cabinets I compiled on my Clever Cabinet Ideas Board on Hometalk.


You won't want to miss the rest of these Clever Cabinet Ideas.
You can visit my board on Hometalk HERE.

And next time you look at a discarded cabinet, just let your mind ponder the possibilities


If you haven't checked out Hometalk yet, you really should.  It's just overflowing with Home Improvement ideas and inspiration all being shared by Professionals, Bloggers, and Homeowners alike.  You can create an account to share your projects and even ask questions when you need help or advice on any home related subject.

Plus you can follow all of your favorite Hometalk peeps to see what amazing projects they are sharing there!

What are you waiting for?

Sharing With:
http://www.redflycreations.com/
Continue Reading ...

4/14/13

Tank Top Beach Bag

Sometimes you just have to take what you've got and make it into something better or more useful.  Like this tank top I turned into a beach bag.  I never wore the tank top, not even once, but this beach bag is about to take a trip to Hawaii with me!


I bought this tank top on clearance at a little boutique a few years ago.   It was adorable!  I loved how it looked...


...ON THE HANGER!  

It was adorable with the sweet fringed neckline and the sheer pleated body.  So romantic.  A bit sexy.
But it didn't look cute on me!  
The color is too close to my skin tone so it washed me out bad.  Not good!
That will teach me to try things on before I buy them.

Even if they are only $5.00 on clearance.


So I put it in the donate bag and there it sat.  Until the other day when I saw some tank top totes on Pinterest.  I didn't pin them because I had no intention of making one so I can't share who made those particular totes I saw that day.  There are numerous versions you can find online though.  Just type tank top tote/bag into the Google or Pinterest search bar and see what comes up.  :)

Then the other day I was thinking about what I would carry my towel, sunglasses, book and sunblock in while in Hawaii and those tank top totes popped into my head.  And I pulled out my tank that had never been given it's day to shine and here's what I did:


I grabbed a piece of scrap fabric I had that was a nice tropical print on a cream background.  This would become the lining for my beach bag.


I measured how deep I wanted my bag and cut the lining that long.  I traced the arm holes and straps because these would become the handles of my new tote.


Once the measuring was done I folded and cut out my lining fabric to size.


I also cut a couple of strips of lining fabric for reinforcing the tote handles.


I sewed up the sides of the lining fabric.  The bottom was the fold so it didn't need to be sewn.


Here's how it looked once the sides were sewn up.  (above:  I turned it right side out for this photo) 
This piece gets turned inside out again and put inside the tank as a lining.  My tank was so sheer and "stretchy" from those pleats that I wanted to give it some form with this lining fabric.


I folded the handle pieces over and sewed down the edges then turned them right side out using a safety pin to push through.


The bottom of the tank was sewn with a zig zag stitch, the excess cut off and turned right side out again.


The lining was put inside and stitched all around the edges with a zig zag stitch to attach...sewing the little handle reinforcements under the straps.

This isn't much of a step-by-step tutorial but honestly, it wasn't too difficult.  

If you use a tank with a more substantial fabric you could create a bag without adding a lining at all...just hem up the bottom and voila!


It's the perfect size to carry my beach stuff around.  

It's cute enough to carry into a restaurant or shop as well.


And that's just what me and my new bag will be doing when we arrive in Hawaii next weekend...bumming it on the beach or shopping the open air market and sipping Mai Tai's at local restaurants.

Wish I could hide you all in my bag and take you with me :)


I hope you come and visit next week when I've got a couple of wonderful guests coming to share their fabulous~ness with you while I'm gone!  You won't want to miss them.

Aloha!
Sherry

Sharing with:


Continue Reading ...

3/17/13

Quick~change magnetic desktop photo display


Do you crave change?

Do you move your furniture around often just to give yourself a fresh perspective?

Do you like to switch out the decor and items displayed in your home often?


 I do.
I've been referred to as a chronic re-arranger.  Yep, that's me.  And proud of it.

Plus you never know what you might find behind that tv cabinet (think arsenal of nerf darts at my house)...or under the couch (enough money for an ice cream bar ~ if you're not on a diet!)

I've moved some pretty hefty furniture by myself too.  Scott has come home on occasion and questioned who may have helped me.  No secret furniture moving boyfriends around here though.  Promise ;)
I think I get 'super furniture rearranging powers' when the desire overtakes me.  Maybe.

But on to the desk frame  :)


This wooden piece is what remains of an inexpensive desk clock after I robbed it of it's clock-works.
(You can see what I did with all those clocks HERE.)
I couldn't bear the thought of chucking these little wooden frames.  There had to be something useful for them.  A few ideas have come to mind, so expect to see more of these cuties later...

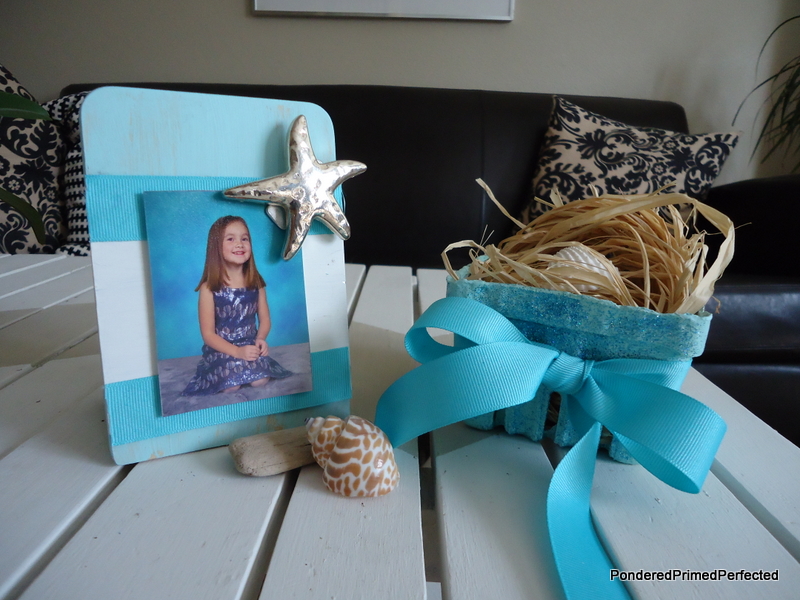
This one has become a quick~change magnetic desk frame


I painted it with acrylic craft paint using a dry brush technique, which left some of the wood peaking through.


I bought this metal plate for .79 cents at the hardware store.  My plan was to wrap it with this fabric and attach it to the front of the frame.  I cut a piece of the fabric...


Folded it around the metal plate and taped the corners and edges down.
BUT
When I put it on the front of the wooden base it looked kinda like a quilt square...
not the look I was going for.  Scratch that.  I didn't even leave it there long enough to take a picture.  Sorry.


I ended up painting the metal with a coat of white acrylic paint and glueing it to the front of the wooden base with E6000.

A couple strips of ribbon were then glued to the top and bottom of the metal.


I glued a scrapbook flower to a small round magnet with E6000 also.
This holds the photos in place.


Now all those darling photos can be swapped out regularly...giving all our lovely friends and family their day in the limelight.

Right where we can see them!


And if I want to go beachy I just swap out the flower for this starfish magnet.  :)
(Isn't that Farmers' Market Basket cute?  You can find that HERE too.)

Okay, that's one wooden clock base down and only...hmm...11 more to go!

What would you use these wooden bases for?   I would love to hear your ideas.

And thanks for stopping by today.
Loved having you here!
Sherry 


sharing with:
http://www.therusticpig.com
http://carolynshomework.blogspot.com
http://homecomingmn.blogspot.com
http://www.craftjunkietoo.com
http://thefrugalgirls.com


FOLLOW US!


Continue Reading ...

2/23/12

Our Very Own Vintage Window

{I told you I would share when our very own window was done...}


Beautiful Windows


Like These:


 Destined for a landfill.

Just doesn't seem right, does it?

These beautiful windows have so much history. 

They still have life left in them.

Too much to just be wasted, broken and forgotten.

So we rescued them.

And we started giving them new life and new homes.

One by One.

You may have seen one or two of them before, cleaned up and ready for their new families.

This one's part of Our Family now:


Painted in a soft green with crisp white lettering.
Just needs a little distressing.  :)

WE ABSOLUTELY LOVE IT. 


I wonder what all our other orphan windows will become?

Continue Reading ...

12/21/11

Playroom Sensory Table


Who needs a coffee table, anyway?

We bought our tray top coffee table many years ago, when we lived in our previous home.  Actually, it was the first time we bought furniture together as a married couple.  Sweet, I know.  :)  So this table felt special to us.  It just never seemed to fit right in this house.  The rooms are narrower.  We need space to move around in.  Put our feet up.  Children have to do somersaults and dance and such!
 
So last Christmas I gave myself a gift.  An ottoman who's lid flips over to become a tray.  

But what would I do with the "old" coffee table???

Yeah, don't pick on the Boys...this was taken last Thanksgiving...it's football and nap time!

Pictured here is my dad, my son and my brother in law.  Everybody else (I swear) was in my tiny kitchen...I think about 15 of them, to be exact.

Then inspiration struck!

I'd been dreaming of a nice sensory table for my playroom. The kids were playing with sand and water inside big bins that I would just place on the floor. But my playroom is not huge. There really isn't a lot of room for larger furniture and accessories or the kids don't have space to spread out and really PLAY. So, without boring you with too many details...here is what we did with our beloved old tray table.

This one you have to see!!!

Scott sprayed the table with a creamy white enamel...
I added one of my favorite Dr. Seuss quotes.  I cut these out of sticky-backed vinyl using my Cricut.

I couldn't leave the little chippy chairs out, now could I?

This one's for Thing One!

And this one's for Thing Two!

The table top is so shiny because it's a piece of scrap acrylic cut to fit inside the tray top...smart, huh? 
(This was my idea but we'll let Scott think it was his, k?)

Perfect for dry erase artwork!! 

These are dry erase CRAYONS!  They are AWESOME!  You can wipe them off with a little mitten that comes with them. They wash off of EVERYTHING with a little bit of soapy water.  Genius, I tell you.
But that is not all, no that is not all...

The acrylic table top lifts off to reveal an endless supply of playtime possibilities...

My darling, amazing, handy, creative, generous, willing, smart, hard-working husband (yes, all of those and more!) cut a hole just the right size for my sensory bins to fit into! 

So the children play with sand (Moon Sand is pictured here)...and they play with water...and ice...and colored rice...and cotton balls...and bubbles...
Oh yes, the possibilites are ENDLESS...Just like their imaginations!

Sometimes they like to bring the dishes from the kitchen and make birthday cakes with Popsicle sticks for the candles.  It's always my birthday for some reason.  Do you think that means I seem really old to them???  Haha!

I hope you like what you see!  If you haven't already done so, please become a follower.  There is so much more that we want to share with you, if you are willing!  You can follow us on Facebook too.

And remember:

"A person's a person, no matter how small."

I hope each and every one of you is able to enjoy your holiday with loved ones.  May you be filled with the Spirit of Christmas!

Sherry


Continue Reading ...