-
Showing posts with label paint. Show all posts

3/17/13

Quick~change magnetic desktop photo display


Do you crave change?

Do you move your furniture around often just to give yourself a fresh perspective?

Do you like to switch out the decor and items displayed in your home often?


 I do.
I've been referred to as a chronic re-arranger.  Yep, that's me.  And proud of it.

Plus you never know what you might find behind that tv cabinet (think arsenal of nerf darts at my house)...or under the couch (enough money for an ice cream bar ~ if you're not on a diet!)

I've moved some pretty hefty furniture by myself too.  Scott has come home on occasion and questioned who may have helped me.  No secret furniture moving boyfriends around here though.  Promise ;)
I think I get 'super furniture rearranging powers' when the desire overtakes me.  Maybe.

But on to the desk frame  :)


This wooden piece is what remains of an inexpensive desk clock after I robbed it of it's clock-works.
(You can see what I did with all those clocks HERE.)
I couldn't bear the thought of chucking these little wooden frames.  There had to be something useful for them.  A few ideas have come to mind, so expect to see more of these cuties later...

This one has become a quick~change magnetic desk frame


I painted it with acrylic craft paint using a dry brush technique, which left some of the wood peaking through.


I bought this metal plate for .79 cents at the hardware store.  My plan was to wrap it with this fabric and attach it to the front of the frame.  I cut a piece of the fabric...


Folded it around the metal plate and taped the corners and edges down.
BUT
When I put it on the front of the wooden base it looked kinda like a quilt square...
not the look I was going for.  Scratch that.  I didn't even leave it there long enough to take a picture.  Sorry.


I ended up painting the metal with a coat of white acrylic paint and glueing it to the front of the wooden base with E6000.

A couple strips of ribbon were then glued to the top and bottom of the metal.


I glued a scrapbook flower to a small round magnet with E6000 also.
This holds the photos in place.


Now all those darling photos can be swapped out regularly...giving all our lovely friends and family their day in the limelight.

Right where we can see them!


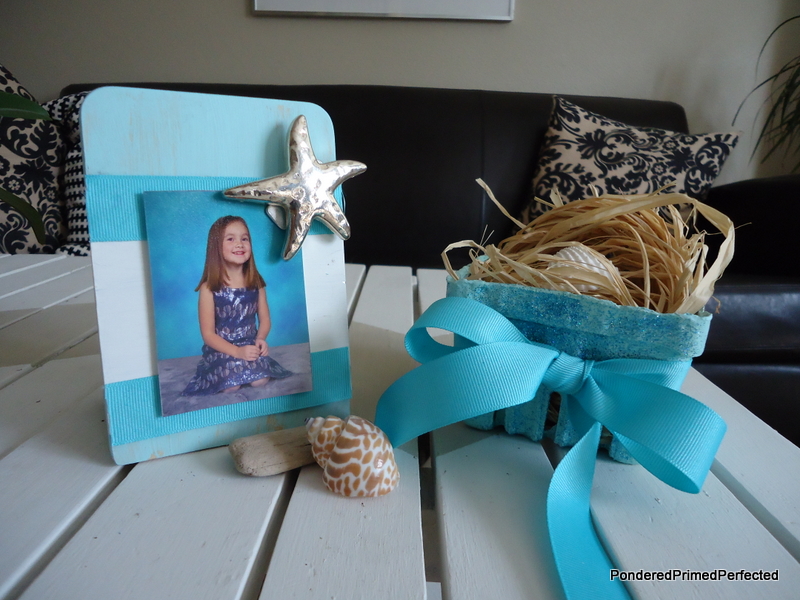
And if I want to go beachy I just swap out the flower for this starfish magnet.  :)
(Isn't that Farmers' Market Basket cute?  You can find that HERE too.)

Okay, that's one wooden clock base down and only...hmm...11 more to go!

What would you use these wooden bases for?   I would love to hear your ideas.

And thanks for stopping by today.
Loved having you here!
Sherry 


sharing with:
http://www.therusticpig.com
http://carolynshomework.blogspot.com
http://homecomingmn.blogspot.com
http://www.craftjunkietoo.com
http://thefrugalgirls.com


FOLLOW US!


Continue Reading ...

2/21/13

Chevron Stripe Table Makeover ~ a.k.a. Folding TV Tables


Our new coffee table slash folding tables a.k.a. tv trays, being presented to you by the beautiful Miss Sadie!


These tables were passed on to Scott and our family by an amazing relative who was fondly called Grandpa Chuck.  He was grandpa by marriage but that didn't matter to us.  He was the greatest.  He was always tinkering away in his wood shop.  He made all kinds of toys and furniture for the family.  It was a privilege to receive something made by Chuck.  When he wasn't in the wood shop he was in the garden growing some gorgeous flowers and veggies while Helen was in the kitchen canning and preserving.  We used to go visit them at their home near the beach and play Pinochle with them for hours.  Then we would pig out on sugar free ice cream (because Helen was diabetic) and sit and talk until bedtime.  They were always bantering back and forth...so cute.  Such great memories of the good times we had together.  They were so fun.  They taught us so much.  Miss them bunches!

So these folding tables carry with them a lot of fond memories.  
We wouldn't want to part with them.  


BUT...I did want to lighten them up a bit.  Give them a little bit of fun personality to go with our space.  I don't think Grandpa Chuck would mind.  I hope not!  

First I painted them with a crisp white. 
Then, as you see in the picture above, I taped off a large chevron stripe 
(or arrow) on each table.  I used Maison Blanche paint in Cobblestone to add the stripe detail.  I wanted the stripe to be somewhat subtle and not overpower the rest of the room, but still add interest.

(Maison Blanche paint is available at Fox Hollow Cottage if you are interested)


Once the chevron stripe was completed I removed the masking tape:


Much better!  
They just needed a couple of touch ups where the white paint had chipped and they were done.

Now they look good enough to use as a coffee table in this room. 


Perfect for setting a steaming mug of coffee on, or holding a laptop.  Easily moved out of the way and folded up for when I exercise in here.


They can even be pulled apart and used as "t.v. trays" from time to time. ;)
Although we don't have a television in this room.  


My orchid (minus blooms!) looks great here too.  (Anyone have any orchid care or advice for me - I'm open to hear it.  Poor little thing just won't bloom.)

(Let's just pretend you don't see the primed end table in these pics...it's mid makeover :)

What do you think about the new look?

Better, right!?


Image Map
Continue Reading ...

2/16/13

Colors of Springtime ~ DIY Farmers Market Baskets


Wouldn't it be nice if it were springtime already?  I'm craving the things that come along with spring.
  
Today we were blessed with some golden warm sunshine here.  It came close to 60 degrees!  Just a little tease for us Pacific NorthWesterners.  We're pretty much guaranteed a couple months of rain still.  

So a magical day like today is just what we needed to tide us over until those beautiful sunny months are finally upon us.  


A little "fix" of pure sunshine will get us through the gray, wet months still to come.

You know what else reminds me of springtime?

Fluffy Clouds and Rainbows
Tree Blossoms
The Smell of Fresh Mown Grass
Short Sleeves
Kids Voices and Laughter Carrying On the Breeze
Ladybugs and Butterflies
Evening Strolls and Bike Rides
Hammocks
Planting Gardens
and 
Farmers' Markets


Last summer I created a white Anthropologie Knockoff Farmers Market Basket (Below).  

Say that a few times quick!

I used one of the cardboard baskets that berries come in and coated it with some Gesso (used to prime and stiffen artists' canvases), white spray paint, and spray polyurethane.
You can read about it HERE.


I thought it would be fun to make more using some spring colors, so I got busy mixing my Gesso with acrylic craft paint until I had the pastel colors I desired. 

Once they were painted I got all glittery-eyed and decided they needed some glitter too.


The Gesso makes them really stiff and the polyurethane makes them water proof.  

The glitter just makes them cheerful!


Then I dressed them up with ribbons and filled them with a few little trinkets. 
These will make adorable mini Easter baskets or fun little gift baskets for friends.

In the first basket I put some raffia, a Sweet Little Bluebird, and a mini egg.


The next one got some pretty seashells and a silver starfish.  


Gifts from the Seashore.


This next one holds some fragrant lemon body treats.  I love lemon!  


I haven't decided what to do with this Tiffany Blue one yet.  Its my favorite, with the gleaming organza bow.  I might just have to keep it next to my bed for holding jewelry and other stray stuff.  :)


These were easy to make and didn't cost anything since I already had the cardboard baskets saved from last summer.  The Gesso, paint, glitter and polyurethane were already in my craft cabinet.  


My Inspiration:
anthro farmers market baskets
Anthropologie's Farmers' Mkt Baskets

Here's to more sunny days and laughter being carried on the breeze!
Sherry


Continue Reading ...

12/7/12

Cabinet Door Makeovers at P3

As I was creating an updated Project Gallery, I noticed how many cabinet door makeovers I've finished.   I thought I would pull them all together here in one post and let you take a look.  I have some ideas for a few more...I'll add them when they are done.

My Handyman scored a stack of these unfinished doors at a cabinet shop that was shutting it's doors for good.  We got these doors for about 30 cents a piece.  Great price for a DIY project, if you ask me!

Click on the photos below to be taken directly to each post:

Time Zone Wall Art

Decorative Serving Tray

Rustic Chalkboard with Family Name

Cheese and Wine Pairing Tray
Hot Chocolate Station & Tray Tutorial

Weekly Menu & Shopping List Chalkboard

And if you haven't stopped by Inspiration Cafe today you should go meet our Guest Poster, Marci from Stone Cottage Adventures.  She's sharing some pretty and very unique jewelry making techniques.


Sharing with:
Continue Reading ...

11/15/12

"Cheeky" Industrial Window Box


If you know me well you know this means I love you a whole "LATTE".  

There are a few things I love as much as my morning coffee...chocolate, wine and most importantly my family and friends.  Those would be the top ranking contenders anyway...not necessarily in that order.  

I guess it kinda depends on the day, wink wink!


We've had this plain wooden box forever.  It's a cd holder.  I'm not sure where we got it.  I think Scott may have had it before I came into the picture.  (I know...how did it even survive the "we-can-live-without-this-purge" that happened to Scott's stuff when we moved in together???  Scott is still searching for some of his bachelorhood belongings.  Sorry Honey.)


I painted it black.  Distressed it a bit.  I  only need to distress A BIT because everything ends up distressed in our house.  

I printed this saying on regular printer paper using several different font sizes then traced it onto the box with a ball point pen.  The wood is soft so that made this the easiest method.  Tracing left indentations for me to follow with my paint pen. I gave it a quick sanding to roughen it up a bit more.  I could have cut the words out on my Cricut to create a more polished look but...hey...I kinda like imperfections.  ;)

Added a couple of rusty old hinges I found in Scott's shop.  (Yeah, he'll be looking for those later too.  I'm sure lucky he loves me!)

Threw in my freshly cut wheat grass.


It seems an appropriate message sitting right here in the window next to my coffee station.  


And if it's a morning when I'm not feeling the inspiration so much...I'll just turn it around and have it say this...


Continue Reading ...